May 29, 2011

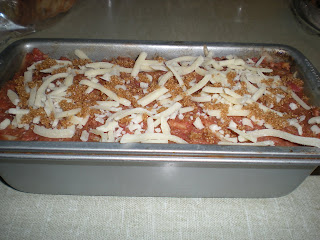
Loaded Potato Stuffed Meatloaf


Meatloaf is often thought of as boring and mundane, something you grew up eating at your mother’s kitchen table (dry and tasteless) or as “meat surprise” in school (a slice of some kind of meat topped with ketchup served on a tray with instant mashed potatoes and green beans ... where the only thing that could make the meat more edible was by covering it with more ketchup and trying not to think about what might be in it). Whether it was “Mom’s meatloaf” or the School Cafeteria variation, it rarely left a good impression!

Nowadays, you can find quite a few good meatloaf recipes floating around out there. I make meatloaf for dinner every so often, so I will have a few good recipes to experiment with and share, but this one is a variation on one of my favourite types of meatloaf to eat: Stuffed Meatloaf.

I’m not even sure where the idea for this came from, perhaps something I saw on TV somewhere (I love that show ‘Diners, Drive-Ins and Dives’) ... but it has been rolling around in my mind lately to make a meatloaf that was reminiscent of a loaded baked potato. I love loaded baked potatoes, and so I decided to try a Loaded Potato Stuffed Meatloaf.

Meatloaf, like meatballs, is rarely made with pure ground Beef. A mix of Ground Beef, combined with ground Pork and ground Veal makes the meat more tender and less dense, and adds a depth of flavour. For this recipe, you’ll make the basic meatloaf mix as per usual, with the addition of some BBQ Sauce and Bacon Bits/Chopped Bacon, but you’ll stuff it with a Potato mixture that adds some moisture, some colour, a different texture, and some interesting flavour! 

Ingredients:

1 lb.                 Meatloaf Mix – 1/3 each of Ground Beef, Pork and Veal
1 Cup              Bread Crumbs
¼ Cup             Onion, chopped finely
¼ Cup             Bacon Bits or Chopped Bacon
¼ Cup             Parmesan Cheese, grated
¼ Cup             Shredded Cheese – cheddar (optional)
¾ Cup             Ketchup
¼ Cup             BBQ Sauce – your favourite type
2 TB                Dijon Mustard
2 tsp.               Worcestershire Sauce
1 tsp.               Liquid Smoke (optional)
1                      Egg (beaten)
Parsley, chopped finely
Spicy Mesquite Spice Mix (I had it on hand ... I didn’t use salt or pepper in this recipe because this Spice Mix includes them both. If you don’t use this spice mix, I would add salt and pepper to taste).
1 TB                Brown Sugar
2                      Potatoes (I use Yukon Gold), peeled

Directions:

Combine: Ground Meat, Bread Crumbs, Onion, Bacon Bits, Parmesan cheese, Shredded Cheese, Parsley, Spicy Mesquite Spice mix in a bowl and the beaten Egg.


In another bowl, combine: Ketchup, BBQ Sauce, Mustard, Worcestershire Sauce, Liquid Smoke.


Add wet ingredients into the Beef mixture. [optional: can save 1/4 Cup for glazing]

Use your hands and make sure all ingredients are well mixed.

For the Potato Stuffing: Cut your potatoes into smaller pieces and boil for about 20 minutes until they come apart with a fork. Drain. When slightly cooled, smash them with a fork and add a pinch of salt, bacon bits, sour cream, chopped chives and shredded cheddar cheese. Mix together well to combine. [Alternatively, if you have leftover mashed potatoes, this is a great place to use them ... just add a couple of the “fixin’s” and use up your leftovers]

Now, lightly oil your meatloaf pan – it should be a shallow 7 by 10 in. pan or bread loaf tin.

Use about half the Meatloaf mixture and layer the bottom and sides of the pan, leaving a hollow ditch in the middle.


Spoon the Potato Stuffing mixture into the hollow and press gently to smooth it out.


Then layer the rest of the Meatloaf mixture on top to cover.

Brush the top gently with the reserved wet ingredients from before OR sprinkle with cheese and a touch of brown sugar.


Cover with foil and bake in a 350 degrees Fahrenheit oven for 60 – 75 minutes, or until a meat thermometer registers 170 degrees F (75 degrees C). Uncover for the last 5 minutes or so.

Let Meatloaf sit for 5 minutes before slicing and serving.


I don’t make mine with gravy because I find it is moist enough without. I usually serve with a side of steamed broccoli and/or carrots.

I find that Meatloaf reheats very well and is good in sandwiches the next day.

May 17, 2011

Let's Talk Clematis ...


CARING FOR CLEMATIS:

Clematis need 2 main ingredients to be happy and healthy in your garden.

1. The first is consistent moisture. Contrary to popular opinion, clematis do not require “shaded feet” specifically ... what they really need, and what is present in that shaded soil (whether it is shaded by mulch, rocks or other shallow-rooted plants) is moisture. Moist soil is what Clematis crave ... they love being watered deeply but do not do well in standing water so proper placement is very important.

2. The other key to clematis success is treating all pruning types of clematis as Group 3 types for their  first 2-3 years in the ground. This stimulates root development and the emergence of more stems from the ground. Also, if you plant your Clematis several inches deeper in the ground than they are in their original containers, it can result in new stems that develop from the soil line and also gives the plant a base to resurrect from in case it is killed back to ground level for some reason. Being cut back every Spring for the first couple years will promote more basal growth and more flowering stems. 

I cannot stress too much that proper pruning of these young plants is absolutely critical for their future growth and development. All too often I have seen a perfectly good little clematis which has been planted out and allowed to develop one very long, spindly growth. And the owners have complained that either it's a weak plant or it doesn't flower well when the only real problem is how it's been treated. A plant like this will take years to develop properly if it ever does.  Roots and top growth need to develop proportionately. Top growth needs to be restrained until root growth is sufficient to support it.

PRUNING CLEMATIS:

Pruning Group 1 (A) – The Ramblers and Early Bloomers
These will flower on "old wood"- i.e., previous season's growth. Light pruning to remove any dead bits and neaten it up is all that's needed. They don't require any pruning, but if you're going to do it, do it right after bloom. Whatever grows between the time you prune and the following spring probably won't bloom next year, but all the old wood will, and you can control the growth of ramblers beautifully that way. (In other words, if you want your Clematis to grow only 7 feet tall, for instance, prune it back to 7 feet right after it blooms. The only other reason to prune your Group 1 Clematis is to remove any dead or diseased growth.

Pruning Group 2 (B) – The Big Flowered Summer Bloomers
Group 2 Clematis mainly blooms on "old wood," which simply means stems that grew last season or earlier (but will also sometimes bloom on some newer wood as well). You don't want to prune too radically. Remember that the largest flowers will be produced on old wood, so you don't want to remove too much.  The rule of thumb is that in earliest spring, cut back each stem about 6 to 8 inches, to right above the point where it branches. At this branching point, you should see a pair of little bumps. These are buds, and you want to keep them. These are repeat bloomers so you’ll want to prune again immediately after flowering

Pruning Group 3 (C) – The Late Bloomers
Unlike other types of Clematis, Group 3 blooms on "new wood" (which means the current season's growth; if you keep last year's flowering stems on the plant, they won't set buds).
Remove all the old growth until you're left with a couple of stems about 6-12 inches from the ground.  Be ruthless, ignore the fat buds you see further up the stem, and cut back to a height of roughly 6"-12" (this should include 2 strong sets of buds). You will be rewarded by the emergence of vigorous new shoots from the base which will result in a nice, full, multi-stemmed plant loaded with flowers.

Late season pruning of clematis is not recommended in areas which experience cold winters.  Any unexpected warm spell will encourage new growth which will certainly be killed by the cold spell that follows.  So resist the temptation to tidy up the clematis tangles in the fall...wait until Spring.

Bloom Timing -
Clematis Group 1 are the earliest Clematis to flower, they’ll give you Spring blooms. Clematis Group 2 begin their main bloom season in early summer, about the same time as Roses (which is why they are such great companions). Many bloom most heavily in early summer, then steadily for the rest of the season; others offer a big flush in early season, then repeat (often not as profusely) in late summer and into fall. Clematis Group 3 begins to flower in mid-summer and will continue into fall. 

 
You want to allow the plant to develop three to five sets of leaves and then pinch the growing tip off. This will stimulate auxiliary bud breaks which will double the number of vines that can produce flowers. Once these new buds break and start developing into vines with about three-five sets of leaves, pinch those growing tips off. Failure to prune all clematis as type III clematis at least the first if not the second year and failure to pinch off growing tips are prime reasons why clematis plants stay single stemmed plants that fail to prosper.

Pruning this way will also encourage both branching and the development of multiple stems from the buds underground. This is particularly important for group B clematis which are notoriously reluctant to fatten up at the base. Two or more years of this treatment may be necessary for the plant to develop a satisfactory framework, but the rewards in terms of future flowering and general appearance are well worth it. During this time flowering is not sacrificed, rather delayed until later in the season.I know it sounds harsh, but it works!

Fertilizing –
And finally, a word about fertilization. Fertilization is important but you can have too much of a good thing. Some people claim that limey soil benefits Clematis but the benefits seem varied. Too much nitrogen will promote nothing but vegetative growth. Phosphorus (the middle number) is the most important because it stimulates root growth and ultimately bloom production. A slow release fertilizer is preferable. I tend to use compost and then water in a tomato fertilizer, once in the Spring and then once in the Fall. It gets the Clematis growing like gangbusters!

PICTURES:

These are actually three different Clematis plants, to show what they look like in the Spring and how to pinch off the growing tips to prune it down to around 12" tall.

Once the snow clears and the brown vines begin to leaf out a little, it looks like this:


Close-up of buds (that you are about to prune off):


The final pinched-back plant - after pruning:


This one is a new plant from last summer, so it still only has 1 stem. I left 3 sets of leaves, and once it branches out a bit, I will pinch each new vine back again. This kind of specialized attention for the first couple years is how you get a multi-branched, healthy plant.

May 13, 2011

' I never knew anyone who was the worse for being a gardener ... '

May 09, 2011


Gardening is a way of showing that you believe in tomorrow.

What grows in the garden, so lovely and rare?
Roses and Dahlias and people grow there.
 
-   A Gardener's Diary